Hướng dẫn sử dụng lò sấy

1. GENERAL DESCRIPTION Thank you for purchasing our product. We know that in today's competitive marketplace, customers have many choices when purchasing laboratory equipments. We appreciate your choosing our quality product. We stand behind our products and want to let you know we are here if you need us. Before you use the unit, read this entire manual carefully to understand how to install, operate and maintain the unit in a safe manner. Your satisfaction with the unit will be maximized as you read this manual thoroughly. Our capable products will satisfy you by the best performance with easy operation.
2. GRAPHIC SYMBOLS BE SURE THAT YOU UNDERSTAND ALL OF THESE SYMBOLS BEFORE OPERATING THE UNIT. This symbol indicates items and procedures that are STRICTY PROHIBITED with regards to the unit. Important operating and / or maintenance instruction. Read the accompanying text carefully. Potential electrical hazards. Explosive. No disassemble. Flammable. Hot surface or steam.
3. KEY FEATURE • Digital display of temp and time • Multi key-in (100Ω(DIN Pt100Ω), KPt100Ω(JPt100Ω), K(CA)) • Precise temperature control • Alarm when timer ends • Auto back up • View window (DO-xx-FG/NG) • Over-temperature protection function • Over-current protection function • Explosion safety door (DO-xx-FG/NG
4.INSTALLATION ① Once the product is delivered, place the package on a flat location. ③ Lift the box as shown in the picture. ② Unscrew the bottom of the box. ④ Unwrap the bag. or ⑤ Place the equipment on your desired location. DOOR ⑥ Lift the remaining plastic up

5.Turn the levelling foot clockwise or counter clockwise to adjust. Serial label shows the electric power specification of the unit. Connect power and turn on the main switch (E.L.B) 50 100 150 200 250 300 320 0 CONYROU CO OVER TEMP dial is placed at the side of the unit. OVER TEMP should be set at least 30℃ higher than the target set temp. If the TEMP CONTROLLER set value is 120℃, OVER TEMP Dial must set over 150℃. (Default value is 250℃)
6. SETTING AND OPERATION 
(1) TEMP mode

Delay Timer.
 
※Be aware that 00.00 means infinite value.The unit will continue to run until the user manually turns it off.

*How to do change <hr.min / min.sec / day.hr>

Ⓒ Press MODE +     button for 5 sec.
           
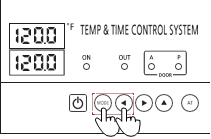
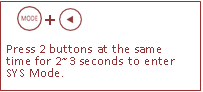
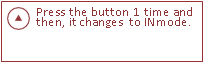
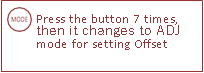
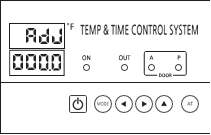
Ⓒ When this display             is shown on, press MODE button for 5 times continuously.


<hr/min><min/sec><day/hr>

Press the     button to select the TIME MODE you want to use.
(3) BEEP mode 


The span of time set under beep mode is the duration of the beeping once the set operating time has been finished.
1 buzzer sound/sec.
The BEEP timer will only operate once TIME mode is set.

(4) Start the unit 


(5) Stop the unit 

When TIME mode ends or operator stops it manually by pressing    the unit will stop running.

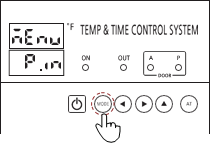
(1)   Example for Temperature offset setting

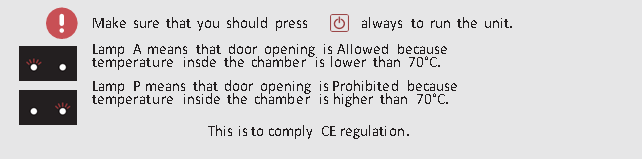
Be careful about the hot air.
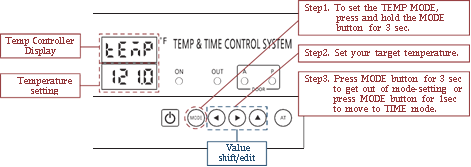
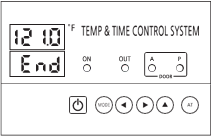
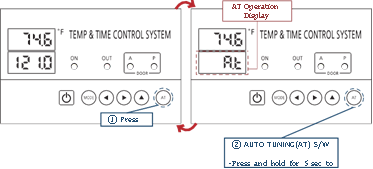
6) Auto Tuning(AT)
AT is recommended under 2 cases.
case1. When the change of current temp is fluctuating more than ±0.1℃.
case2. When the unit can not reach at the set temp.
AT Operation Display
① Press
② AUTO TUNING(AT) S/W
-Press and hold for 5 sec to operate/quit
⤵You can enter / quit AT mode by pressing AT button for 5 sec.

(7) Checking the remaining operation time and the output of heater
You can check the output of heater by clicking "AT" button for 1 sec.
You can check the remaining operating time by clicking "AT" button one more time.
You can return to the original display by clicking "AT" button one more time.


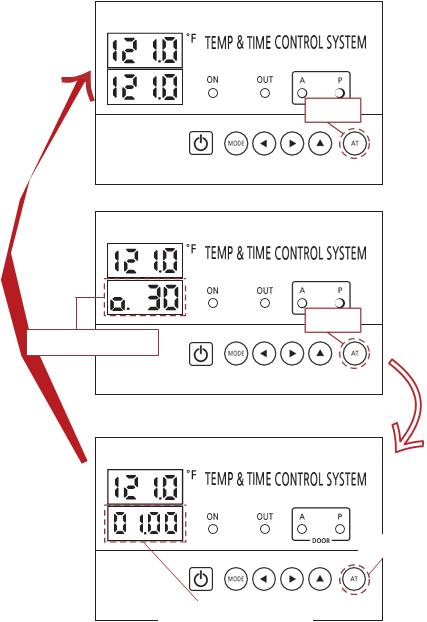
7.Temperature offset setting  
This setting is necessary to keep the optimal temperature uniformity.
Please follow the Offset setting process


Offset setting mode 


Hotline
024.3212.3709
Zalo
024.3212.3709
Viber
024.3212.3709
Youtube
Twitter
Facebook
http://facebook.com/
Facebook
http://facebook.com/
Instagram